


Jika kita membuat blog baru maka mempunyai sebuah Header section , Sidebar-section, main-section dan Footer-section didalam section inilah blogger meletakkan widgets, yang merupakan page elements yang bisa dipilih dari tab template seperti terlihat pada gambar berikut ini:
ntuk lebih memahami setiap bagiannya saya menyertakan juga code untuk masing-masing bagian diatas. Untuk bisa melihat code itu, sebelumnya harus login dulu ke blogger, pilih blognya, layout, template, edit html.
Body – adalah seluruh bagian yang tampil pada browser termasuk Blogger Navbar, pada gambar diatas ditandai dengan warna merah.
body {
background:$bgcolor;
margin:0;
color:$textcolor;
font:x-small Georgia Serif;
font-size/* */:/**/small;
font-size: /**/small;
text-align: center;
}
Outer Wrapper – adalah berisi semua bagian dari blog, bagian ini ditandai dengan warna pink
#outer-wrapper {
width: 660px;
margin:0 auto;
padding:10px;
text-align:left;
font: $bodyfont;
}
Header Wrapper – adalah bagian paling atas biasanya berisi deskripsi dari blog, bagian ini ditandai dengan warna kuning.
#header-wrapper {
width:660px;
margin:0 auto 10px;
}
#header {
margin: 5px;
text-align: center;
color:$pagetitlecolor;
}
The Main Column – Bagian ini berisi postingan dan biasanya paling luas, pada gambar diatas ditandai dengan warna biru.
#main-wrapper {
width: 410px;
float: left;
word-wrap: break-word; /* fix for long text breaking sidebar float in IE */
overflow: hidden; /* fix for long non-text content breaking IE sidebar float */
}
The Sidebar/s – adalah bagian yang berada disisi dari The Main Column/postingan, untuk template 3-column biasanya berada disisi kanan dan kiri. Pada gambar diatas ditandai dengan warna hijau.
#sidebar-wrapper {
width: 220px;
float: right;
word-wrap: break-word; /* fix for long text breaking sidebar float in IE */
overflow: hidden; /* fix for long non-text content breaking IE sidebar float */
}
The Footer – Posisinya berada dibagian paling bawah sejajar dengan Header Wrapper, ditandai dengan warna ungu.
#footer {
width:660px;
height:50px;
clear:both;
margin:0 auto;
padding-top:15px;
line-height: 1.6em;
text-transform:uppercase;
letter-spacing:.1em;
text-align: center;
}
Nah, sekarang kita sudah bisa mengerti dan memahami bagian-bagian utama dari blog kita, untuk selanjutnya akan dibahas mengenai cara membuat template 3-column. Saya sangat mengharapkan kritik, saran dari rekan-rekan yang sudah master dalam hal mengutak-atik template blogger.
source gambar : http://betabloggerfordummies.blogspot.com/
promosi blog lewat search engine
cara mendapatkan traffic, Anda perlu promosi blog. jalan yang harus anda gunakan untuk mempromosikan blog Anda adalah melalui registrasi pada search engine. berikut ini adalah daftar search engine yang dapat Anda gunakan untuk promosi blog/site :
Adnet
http://www.theadnet.com
Ah-ha
http://www.ah-ha.com/addurl
Alldeal
http://www.alldeal.com/add_site
Altavista
http://www.altavista.com/cgi-bin/query?pg=addurl
Arkesini
http://www.arkesini.com/links/links.htm
Anzwers
http://www.anzwer.com/cgi-bin/print_addurl.pl?
Asiaco
http://www.search.asiaco/cgi-bin/addurl.cgi
Asiannet
http://www.asiannet.com/joinus.html
Asia Search
http://expatsinasia.safeshopper.com/
Batavianet
http://www.batavianet.co.id/addurl.html
Canada.com
http://www.canada.com/search/web/addurl.asp
Claymont
http://www.claymont.com/cgi-bin/addurlsform.pl
Crawler
http://www.crawler.com/
Direct Hit
http://www.directhit.com/util/addurl.html
DMOZ
http://dmoz.org/add.html
Euroferret
http://www.euroferret.com/addurl.html
Excite
http://www.excite.com/info/add url.html
Funkycat
http://www.funky-cat.com/webmastera.asp
G.O.D
http://www.god.co.uk/add.htm
Go
http://www.go.com/AddUrl?&pg=SubmitUrl.html
Go2Net
http://www.go2net.com/help/faQ/add-url.html
Google
http://www.google.com/addurl.html
GottaBounce
http://www.gottabounce.com/cgi-bin/links/add.cgi
HotBot
http://www.hotbot.com/addurl.asp
Indo Center
http://www.indocenter.co.id/add.html
Indoseek
http://www.indoseek.co.id/add.html
Info Tiger
http://www.infotiger.com/addurl.html
Infohiway
http://www.infohiway.com/isn/addurl.html
Infoseek
http://infoseek.go.com/AddUrl?pg=SubmitUrl.html
Lycos
http://www.lycos.com/addasite.html
Magellan
http://magellan.excite.com/info/add_url/
MSN.com
http://search.msn.com/addurl.asp
Mugomilk
http://www.mugomilk.freeserve.co.uk/html/addsite.html
National Directory
http://www.nationaldirectory.com/cgi-bin/addurl
Nerd World
http://www.nerdworld.com/nwadd.html
Net Announce!
http://www.ersoros.com/net-announce/content.phtml
NetBreach
http://www.netbreach.com/addurl/
Netfind.aol.com
http://netfind.aol.com/add.adp
NetSearch
http://198.80.94.66/cgi-bin/search.pl?AddSite=prompt
Northern Light
http://www.northernlight.com/docs/regurl_help.html
Peekaboo
http://www.peekaboo.net/index1.html
Power Crawler
http://www.powercrawler.com/addurl.cfm
Project Cool
http://www.projectcool.com/sightings/submit.html
Profusion
http://www.profusion.com/users.sitesee.html
Proteus
http://www.thrall.org/proteus/urlsub.htm
PureSearch
http://www.puresearch.com/addsite.html
Scrub The Web
http://www.scrubtheweb.com/addurl.html
Search Hound
http://www.searchhound.com/pages/submit.htm
Search King
http://www.searchking.com/add.htm
Serach Spot
http://www.searchspot.com/info/suggest_site.htm
Search UK
http://www.url.searchuk.com
Searching 4 U
http://www.searching4u.com/links/link.htm
Site @ Hack
http://www.sitehack.com/submit.htm
Spider Hog
http://www.spiderhog.com/addurl.htm
Shop Internet
http://www.ro.com/shopinternet/submit.html
Super Snooper
http://www.supersnoopel.com/addurl.htm
Surfgopher
http://www.surfghoper.com/addurl.htm
Teledom
http://www.teledom.net/add.shtml
Voila
http://www.voila.com/info/addsite.html
WebCrawler
http://www.webcrawler.com/help/getlisted/addurls.html
Webmaster Network
http://www.wmn.linkopp.net/cgi-bin/add.cgi
World Light
http://www.worldlight.com/addsite.html
Yahoo
http://www.yahoo.com/info/suggest/
canon ip1880/ip1800
Reset ip1880:
- Pencet tombol resume dan tahan sekitar 1 sampai 2 menit
- Buka covernya
- Lepas catridge lalu pasang lagi
- Tutup covernya
- Matikan printer
- Nyalakan lagi
Selamat mencoba, smoga bermanfaat.
Reset Canon iP1200, iP1600, iP2200
resetter ip1880.rar EEPTool_ip1880.rar ip1880.zip iPTool.rar
Read More..Canon PG-40/CL-41/PG-50/CL-51/CL-52 Cartridges
To reset the ink meters (method 1)
- Paste with a thin strip tape the upper horizontal row contactjes
Out of the cartridge (Picture 1)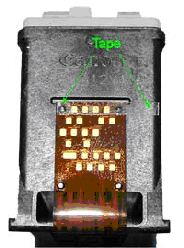
- Insert the cartridge into the printer and close the lid.
- The printer will now on the move, but wait until there on the screen Your computer is the message that there is a wrong way to a Ink cartridge is loaded. Click OK in the message
- Open the lid of the printer and remove the cartridge from there.
- Download Now the strip of adhesive tape and paste it contact now on the Second row (from top) horizontal contactjes. (Picture 2)
- Insert the cartridge into the printer back again and closed the lid. Weather will The printer is on the move again, and again we place an alert on Your monitor. This time, the message that the cartridge can not Be recognized. Click on OK again
- Open the printer and remove now for the last time the cartridge from the
Printer.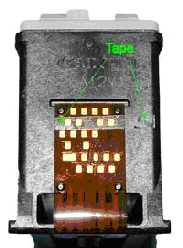
- Remove the tape and insert the cartridge in the printer and connect it Lid.
- The printer is the cartridge back as a new and indicates that the cartridge full again
Resetting the ink meters (method 2)
Works only in some cases
- Read the rest of this entry »
Popularity: 22% [?]
tips speed up your firefox
tipsnya gmn cara Menyedot Bandwidth dg Mozilla Firefox:
1. Buka browser Mozilla Fiefox lalu ketik "about:config" (tanpa tanda petik)
2. Cari preferenc name diwawah ini:
network.http. pipelining
network.http. pipelining. maxrequests
network.http. proxy.pipelining
network.proxy. share_proxy_ settings
3. Ubah value network.http. pipelining menjadi "true" dg klik ganda
4. Modify value network.http. pipelining. maxrequests menjadi "64" dg klik kanan --- modify
5. Ubah value network.http. proxy.pipelining menjadi "true" dg klik ganda
6. Ubah value network.proxy. share_proxy_ settingsg menjadi "false" dg klik ganda
7. Buat baru preference name dg klik kanan, pilih New, kemudian pilih Integer, dan namai preference name tsb dg "nglayout.initialpa int.delay" (tanpa tanda petik), lalu masukkna nilainya dg 0 (nol).
8. Tekan F5 atau refresh atau sekalian restart Mozilla Firefox anda.
tips ini mgkn ga terlalu terasa jika koneksinya benar2 lemot, tp ini sangat cocok utk diterapkan saat kita berada di warnet yg terkadang koneksinya lambat. selamat mencoba, semoga bermanfaat.


